How I Added Sound to TempleOS on JSLinux
Earlier this month, I noticed that Fabrice Bellard added x86_64 support to his JSLinux project, which obviously meant it was time to get TempleOS up and running in the browser.
JSLinux has minimal support for IDE and VGA (mostly for Win2K support) which did not satisfy TempleOS’ requirements, so a few things needed to be implemented (mostly on the JS side) to get things started. In the future, I might write a post about it, but I’ll try not to get ahead of myself.
Silent Temple
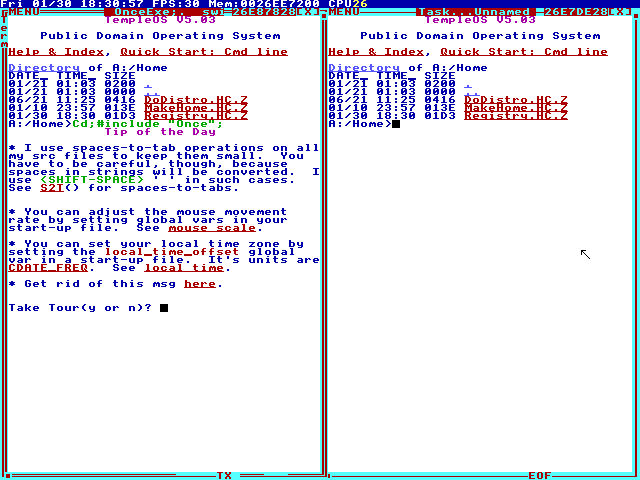
So, now we can run TempleOS in our browser, but things are very quiet, so let’s do something about that.
JSLinux does not list PC speaker or any other sound devices as Emulated Devices. As of this writing, the version of the x86_64 wasm emulator on the official site is dated 2026-01-12, and the source code to this version is not made publicly available.
The most recent human-readable code was released as part of the tinyemu project, with the latest tarball dated 2019-12-21. So, let’s fetch that tarball and get to work.
x86_machine.c
Grepping through, we can see that there is a dummy device configured where the speaker should be. So, we should be able to wire something up, once we know where everything is located.
    memset(&pit_config, 0, sizeof(pit_config));
    pit_config.flags = KVM_PIT_SPEAKER_DUMMY;
    if (ioctl(s->vm_fd, KVM_CREATE_PIT2, &pit_config)) {
        perror("KVM_CREATE_PIT2");
        exit(1);
    }
The data structures we need to note are PITState and PITChannel which will hold the values we need to emulate the sound.
typedef struct {
    PITState *pit_state;
    uint32_t count;
    uint32_t latched_count;
    uint8_t rw_state;
    uint8_t mode;
    uint8_t bcd;
    uint8_t gate;
    int64_t count_load_time;
    int64_t last_irq_time;
} PITChannel;

struct PITState {
    PITChannel pit_channels[3];
    uint8_t speaker_data_on;
    PITGetTicksFunc *get_ticks;
    IRQSignal *irq;
    void *opaque;
};
In tinyemu, there are pointers to these data structures from the PCMachine struct, which represents the virtual machine instance.
typedef struct PCMachine {
    VirtMachine common;
    uint64_t ram_size;
    PhysMemoryMap *mem_map;
    PhysMemoryMap *port_map;

    X86CPUState *cpu_state;
    PIC2State *pic_state;
    IRQSignal pic_irq[16];
    PITState *pit_state;
    I440FXState *i440fx_state;
    CMOSState *cmos_state;
    SerialState *serial_state;

    /* input */
    VIRTIODevice *keyboard_dev;
    VIRTIODevice *mouse_dev;
    KBDState *kbd_state;
    PS2MouseState *ps2_mouse;
    VMMouseState *vm_mouse;
    PS2KbdState *ps2_kbd;

} PCMachine;
Ghidra Time
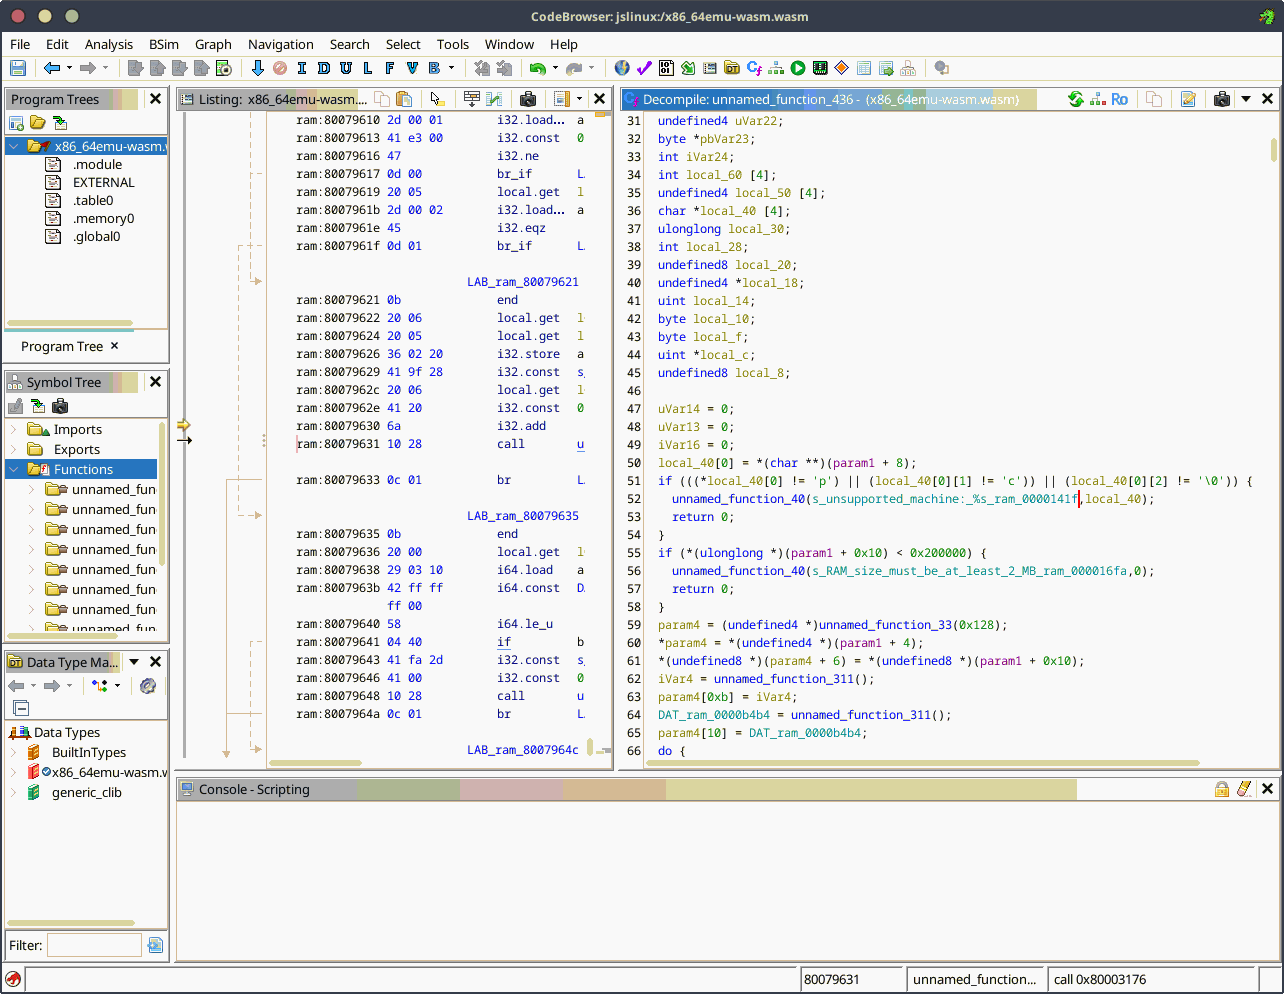
Next, let’s load up the wasm binary in Ghidra and try to locate where on the wasm heap we are mallocing the PCMachine struct.
In tinyemu, at the top of the pc_machine_init function, we see an non-zero strcmp retval on machine name "pc" results in an unsupported machine error message.
static VirtMachine *pc_machine_init(const VirtMachineParams *p)
{
    PCMachine *s;
    int i, piix3_devfn;
    PCIBus *pci_bus;
    VIRTIOBusDef vbus_s, *vbus = &vbus_s;

    if (strcmp(p->machine_name, "pc") != 0) {
        vm_error("unsupported machine: %s\n", p->machine_name);
        return NULL;
    }
...
Searching for the string in the decompiled wasm, we find a reference to s_unsupported_machine:_%s_ram_0000141f in unnamed_function_436 which we now know as pc_machine_init, and unnamed_function_40 can be labeled vm_error.
Immediately following this chunk in the tinyemu source, we have a call to mallocz which is a zeroing wrapper function that calls malloc. The wasm file exports malloc as N, so we can easily identify the mallocz function in the decompiled binary.
    assert(p->ram_size >= (1 << 20));

    s = mallocz(sizeof(*s));
    s->common.vmc = p->vmc;
    s->ram_size = p->ram_size;
We can see in the decompiled wasm there is a call unnamed_function_33 which we can follow the disassembly and see the function matches mallocz in the tinyemu source for cutils.c:
void *mallocz(size_t size)
{
    void *ptr;
    ptr = malloc(size);
    if (!ptr)
        return NULL;
    memset(ptr, 0, size);
    return ptr;
}
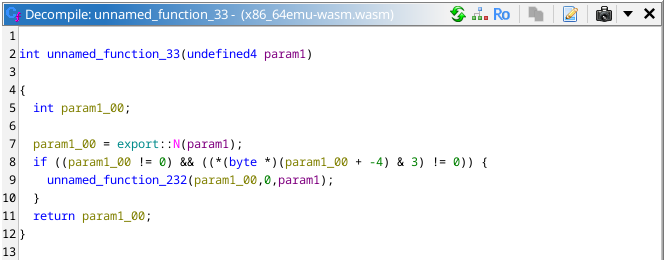
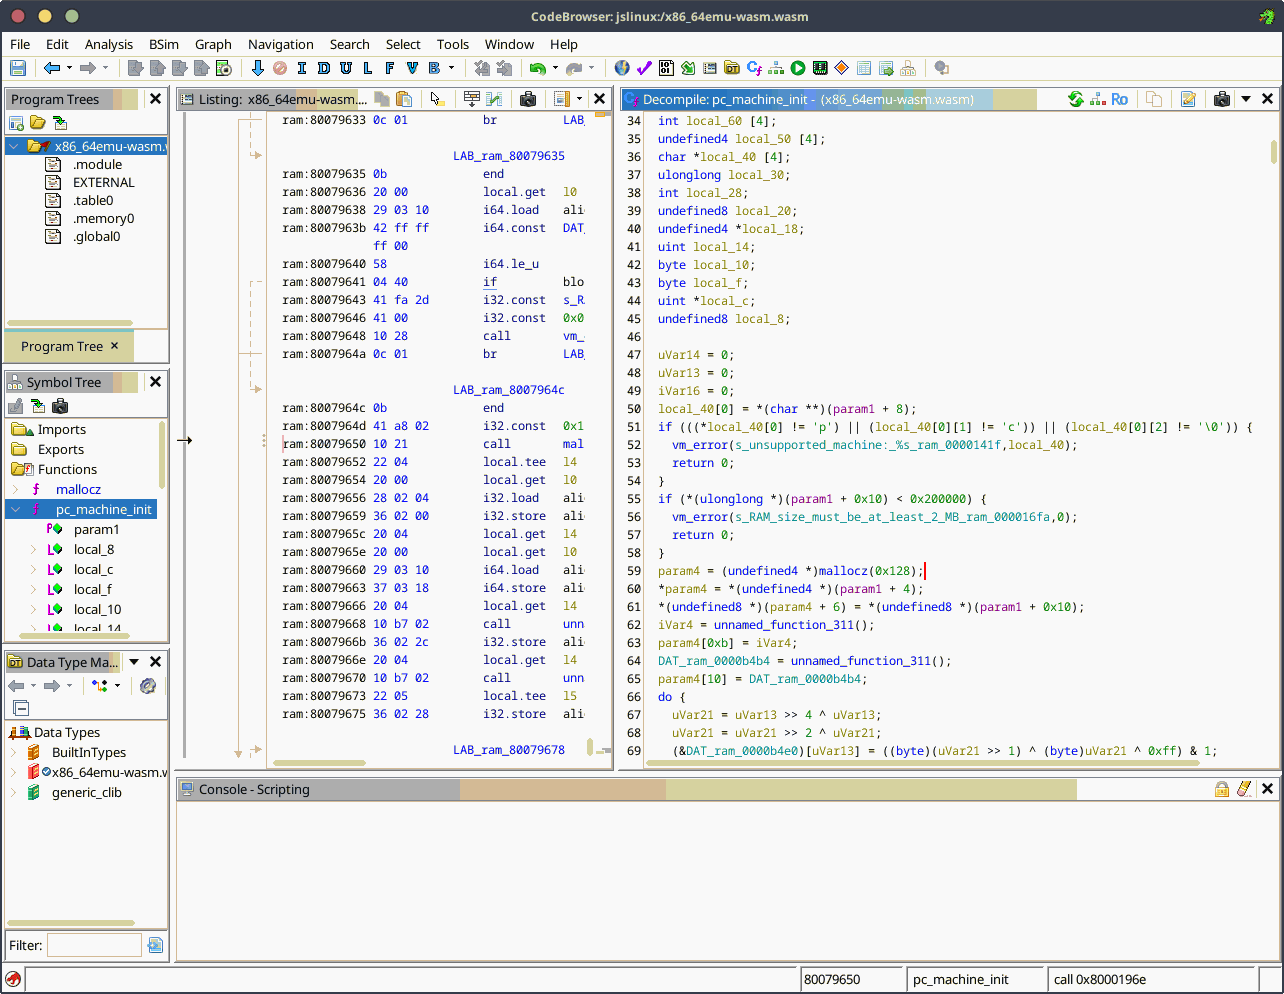
Now that we have identified mallocz, we have the value requested as 0x128 (296 bytes), this is the size of memory requested to hold whatever the current contents of the PCMachine struct is.
So, let’s set some breakpoints on our formerly unnamed_function_33 and see what we get.
Fun With Breakpoints

We hit our first breakpoint, and it shows the request for 296 bytes, called from pc_machine_init. Now, let’s get our return value.
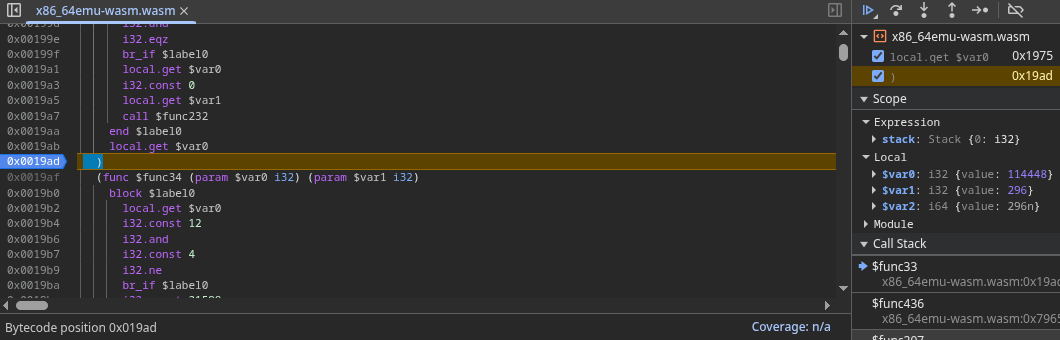
The offset into our browser’s wasm heap is 114448, or 0x01bf10. We can disable the breakpoints and continue booting the machine, then dump a subarray containing the struct data to see what we find.

Making Sense Of It
Marking up the data, we can see that some new members of the struct have been added, but is familiar enough that we can locate the pointer to the PITState.
uint8_t pcmachine_data[] = {
    208,63,0,0,0,0,0,0,0,0,0,0,0,0,0,0,32,227,1,0,0,0,0,0,  // VirtMachine common;
    0,0,0,64,0,0,0,0,                                       // uint64_t ram_size;
    104,195,1,0,                                            // PhysMemoryMap *mem_map;
    192,192,1,0,                                            // PhysMemoryMap *port_map;
    8,207,1,0,                                              // X86CPUState *cpu_state;
    224,197,1,0,                                            // PIC2State *pic_state;
    1,0,0,0,                                                // Some unknown bool
    232,207,1,0,                                            // Some unknown ptr
    56,80,0,0,                                              // Some unknown u32
    176,190,1,0,                                            // Some unknown ptr
    79,0,0,0,176,190,1,0,0,0,0,0,                           // IRQSignal pic_irq[0]
    79,0,0,0,176,190,1,0,1,0,0,0,                           // IRQSignal pic_irq[1]
    79,0,0,0,176,190,1,0,2,0,0,0,                           // IRQSignal pic_irq[2]
    79,0,0,0,176,190,1,0,3,0,0,0,                           // IRQSignal pic_irq[3]
    79,0,0,0,176,190,1,0,4,0,0,0,                           // IRQSignal pic_irq[4]
    79,0,0,0,176,190,1,0,5,0,0,0,                           // IRQSignal pic_irq[5]
    79,0,0,0,176,190,1,0,6,0,0,0,                           // IRQSignal pic_irq[6]
    79,0,0,0,176,190,1,0,7,0,0,0,                           // IRQSignal pic_irq[7]
    79,0,0,0,176,190,1,0,8,0,0,0,                           // IRQSignal pic_irq[8]
    79,0,0,0,176,190,1,0,9,0,0,0,                           // IRQSignal pic_irq[9]
    79,0,0,0,176,190,1,0,10,0,0,0,                          // IRQSignal pic_irq[10]
    79,0,0,0,176,190,1,0,11,0,0,0,                          // IRQSignal pic_irq[11]
    79,0,0,0,176,190,1,0,12,0,0,0,                          // IRQSignal pic_irq[12]
    79,0,0,0,176,190,1,0,13,0,0,0,                          // IRQSignal pic_irq[13]
    79,0,0,0,176,190,1,0,14,0,0,0,                          // IRQSignal pic_irq[14]
    79,0,0,0,176,190,1,0,15,0,0,0,                          // IRQSignal pic_irq[15]
    208,192,1,0,                                            // PITState *pit_state;
...
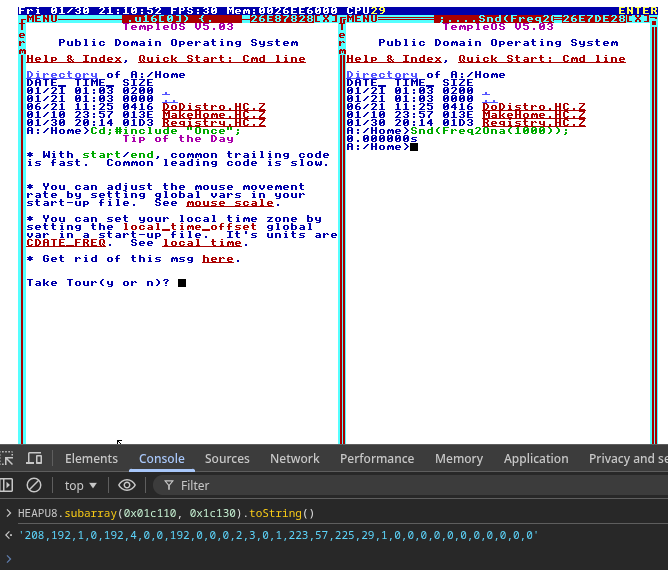
Now, let’s dump a subarray at the PITState offset that is the size of the 3 PITChannels, 96 bytes.

We now have the heap offset of the PITChannels, we think. Are the values being set? Let’s find out.
The heap offset of PITChannel2 data is 0x01c110, marking up the data we can see the initial state of the PITChannel right after booting.
uint8_t pitchannel_data[] = {
    208,192,1,0,                                            // PITState *pit_state;
    0,8,0,0,                                                // uint32_t count;
    0,0,0,0,                                                // uint32_t latched_count;
    2,                                                      // uint8_t rw_state;
    0,                                                      // uint8_t mode;
    0,                                                      // uint8_t bcd;
    0,                                                      // uint8_t gate;
    251,253,35,44,0,0,0,0,                                  // int64_t count_load_time;
    0,0,0,0,0,0,0,0                                         // int64_t last_irq_time;
}
Silent Beeping
So, we are not currently playing sound, gate is 0. Let’s make some (silent) noise.
In TempleOS, we use ona rather than frequency, which can be converted via the following functions:
F64 Ona2Freq(I8 ona)
{//Ona to freq. Ona=60 is 440.0Hz.
  if (!ona)
    return 0;
  else
    return 440.0/32*2.0`(ona/12.0);
}

I8 Freq2Ona(F64 freq)
{//Freq to Ona. 440.0Hz is Ona=60.
  if (freq>0)
    return ClampI64(12*Log2(32.0/440.0*freq),1,I8_MAX);
  else
    return 0;
}
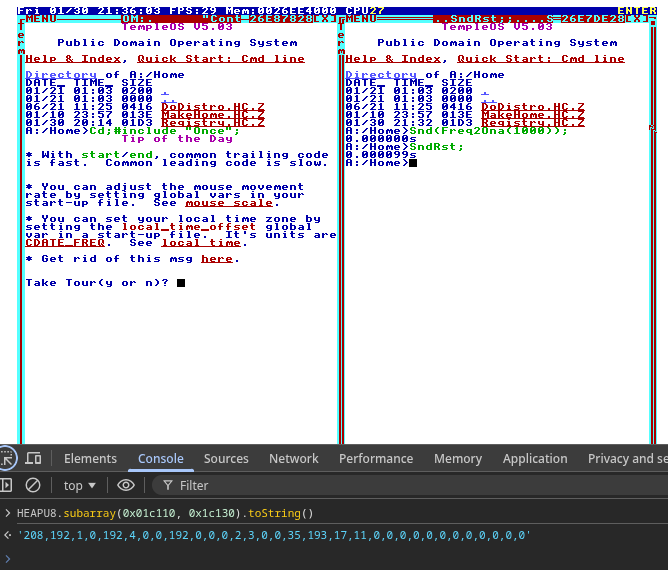
So, Freq2Ona(1000) gives us ona value of 74, which is ~988Hz. We set the PC speaker to start playing this value, and we can see gate is now 1, and count is set to 0x000004c0.
We can get the desired frequency by dividing the SYS_TIMER_FREQ which is 1201471, by count, and we get ~988Hz as the result.
Now, we can do a SndRst; to turn off the speaker, and we see that gate is now 0 again.
Finding The Needle In The Heap
Ok, we currently have an offset in this wasm heap, of this specific browser instance, and we can see if the speaker is on or off, and the frequency of our square wave. But, how can we reliably find the offset from JS, without doing all this breakpoint and pointer juggling stuff?
We can refer back to the PITChannel 0, which is at offset 0 of our PITState structure. The count field is set to its default value on boot, which is 0x000004a8, so we add a function to our JS that will locate the PITState struct and set the pointers in our sound Object.
function set_pit_state_ptr() {
    for (let i = 0; i < HEAPU8.length; i++) {
        if (array_matches_array_at_offset(HEAPU8, [168, 4, 0, 0], i)) {
            os.sound.pit.state_ptr = i - 0x04;
            os.sound.pit.chan2_ptr = os.sound.pit.state_ptr + 0x40;
            return;
        }
    }
    setTimeout(set_pit_state_ptr, locate_needle_interval);
}
(I could have used HEAPU32 but it’s not too much of a performance penalty at the moment.)
Square WaaaAaVvvVvve
Now, in JS we create a new AudioContext, Gain, and Oscillator, set to our desired default values.
function set_sound_defaults() {
    const ctx = new (window.AudioContext || window.webkitAudioContext)();
    const gain = ctx.createGain();
    os.sound.osc = ctx.createOscillator();
    os.sound.osc.type = "square";
    os.sound.osc.frequency.value = 0;
    os.sound.osc.connect(gain);
    gain.connect(ctx.destination);
    update_sound_button();
}
Finally, add a function to read the values from the PITChannel 2 and set the oscillator frequency as needed.
function update_pc_speaker() {
    if (!os.sound.pit.state_ptr) {
        return;
    }
    os.sound.osc.frequency.value =
        os.sound.pit.gate() && os.sound.init && os.sound.on
            ? os.sound.pit.freq()
            : 0;
}
And now we have sound :^) Try it out on TempleOS Playground